One of the most critical aspects of web3 is that it decouples the “data and application” from front ends and user interfaces. For example, this means that even though you can interact with Unlock Protocol smart contracts using the Unlock Dashboard, you can also interact with the contract using other front-end applications, such as blockchain explorers, as well!
Blockchain explorers (also called block explorers) are one of the most useful front end applications in web3. Even though they’re not the most user-friendly, blockchain explorers like Etherscan are a common way to interact directly with smart contracts across the web3 ecosystem.
Each major blockchain has its own blockchain explorer. For example, Ethereum mainnet has Etherscan, Polygon has Polygonscan, Gnosis Chain has Blockscout, and so forth.
Verifying your smart contract
The first step when using a block explorer is to verify the smart contract. (In the Unlock Protocol ecosystem, we call the smart contracts “locks.”) Verification can be done by anyone and takes only a few seconds.
From the Unlock Dashboard, click on the Block Explorer link.
Then, click on the Contract tab. In the screen that opens, look for the More Options button and select Is this a Proxy? in the list of options. On the next screen, click on Verify and then Save in the confirmation popup. Once this has been done, you can click on the link to go back to your contract.
The following video shows you the flow on PolygonScan:
What’s most important is that, at the end of the verification process, when clicking on the Contracts tab again, you now see the two additional options: Read as Proxy and Write as Proxy as on the following screenshot. These new options enable you to interact with your smart contract directly from the blockchain explorer.
Interacting with the Lock Using Blockchain Explorers
One you have verified the contract, you can start interacting with it, to either “Read” data from it, or update it by “Writing” to it. To Read, just click on the Read as Proxy button. You will then see a list of functions you can call on the contract, or even values directly.
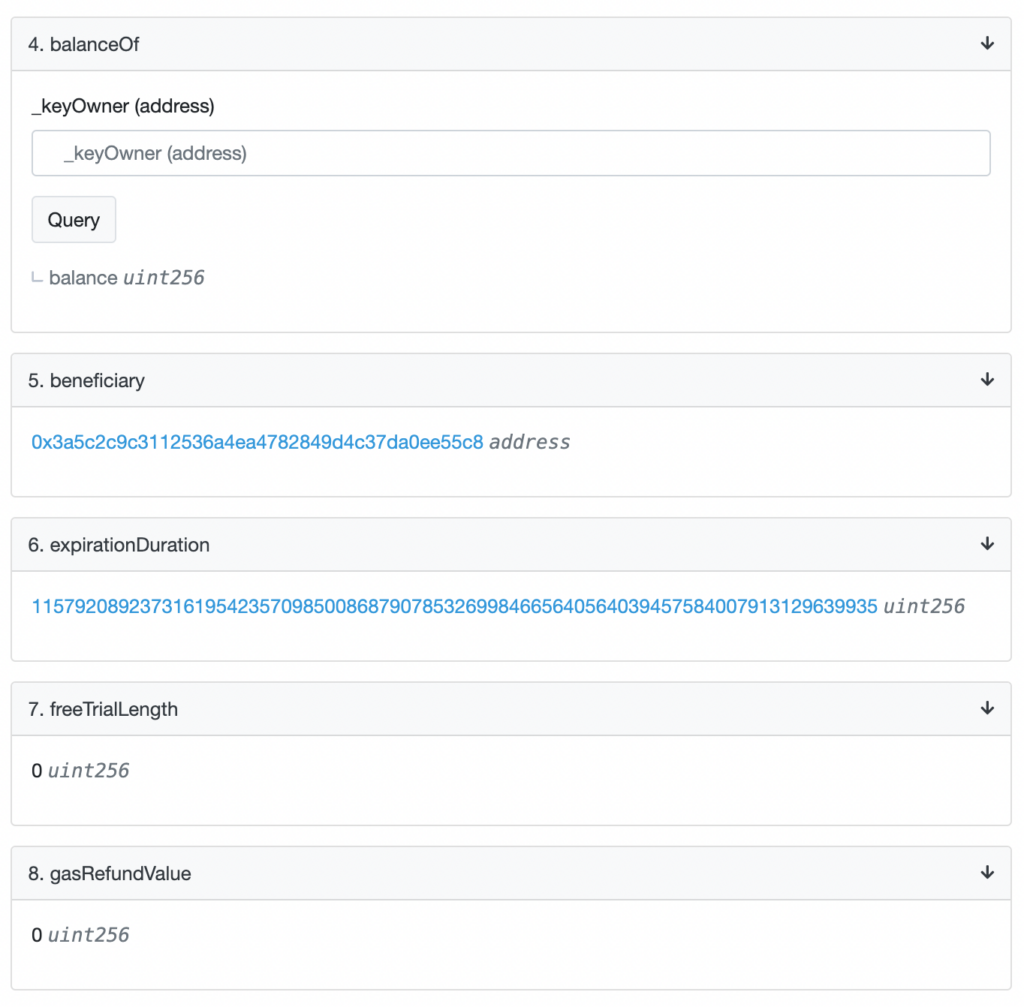
On the following screenshot you can see how many valid memberships a given address owns (that’s balanceOf), who the beneficiary of the contract is (who receives the funds), or the base expirationDuration (the number here means that these are unlimited; they never expire on that lock). You can also see there is no free trial (0 seconds) and no gas refund.
You can also change data on the lock. For that, the first step is to connect your wallet using the Connect to Web3 Button while on the Write as Proxy tab. Your wallet will be prompted to connect to Etherscan. Once connected, you will be able to send transactions to modify the state of your contract. However, you should know that some of the functions require certain permissions. For example, only a Lock Manager can call addLockManager to add another address as a lock manager.
In the video below, we show you how we modify the maximum number of memberships a given address can have a on a specific lock.
Some functions are harder to use than others because they require passing the arguments in a specific “encoded” format. That said, we’re here to help — you’re always welcome to join our Discord to get help from the community!


