
Integrating Unlock with Known
The Unlock API is flexible and easy to use. Now any Known user can use Unlock on their website with a simple plugin. Here's how we did it.
Thousands of people participate in the IndieWeb: a growing movement that encourages people to publish on their own site rather than "silo" networks like Facebook and Twitter. As The New Yorker put it:
Proponents of the IndieWeb offer a fairly straightforward analysis of our current social-media crisis. They frame it in terms of a single question: Who owns the servers? The bulk of our online activity takes places on servers owned by a small number of massive companies. Servers cost money to run. If you’re using a company’s servers without paying for the privilege, then that company must be finding other ways to “extract value” from you—and it’s that quest for large-scale value extraction, they argue, that leads directly to the crises of compromised privacy and engineered addictiveness with which we’re currently grappling.
Known was one of the first indieweb publishing platforms. It lets anyone host a social media profile on their own webspace. You can respond to posts on other indieweb platforms, or invite visitors to discuss directly on your posts.
Integrating Unlock with Known means allowing these indieweb users to sell memberships to aspects of their sites. Disclaimer: I'm the co-founder of Known and its first user. I still use it on my website - and I want to use Unlock there, too. So it was in my interest to create a plugin.
Here's what I wanted to achieve:
- I want to restrict access to long-form content
- I want to restrict access to commenting
- I don't want Known users to have to write a single line of code
In other words, I want to add a paywall to my long-form posts (but just my long-form posts), and I want comments on all posts to be limited to people who have bought access with Unlock.
If you don't care about how I built this, you can stop now: the plugin is available to download on GitHub, and you can install it as a plugin in the latest Known platform. Everything is powered using a simple admin panel.
To build the plugin, I used two aspects of Unlock in tandem: the paywall and the Unlock JavaScript API.
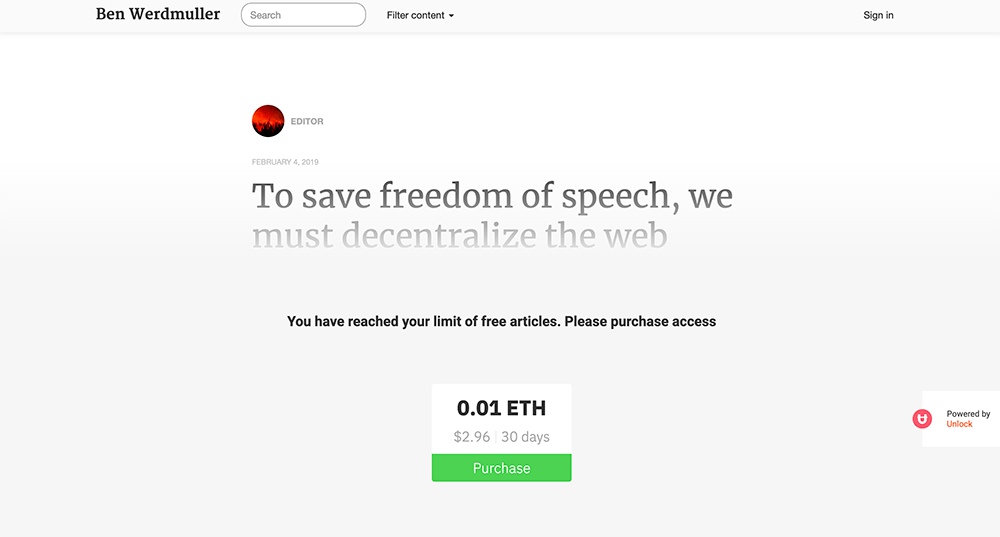
1. The paywall.
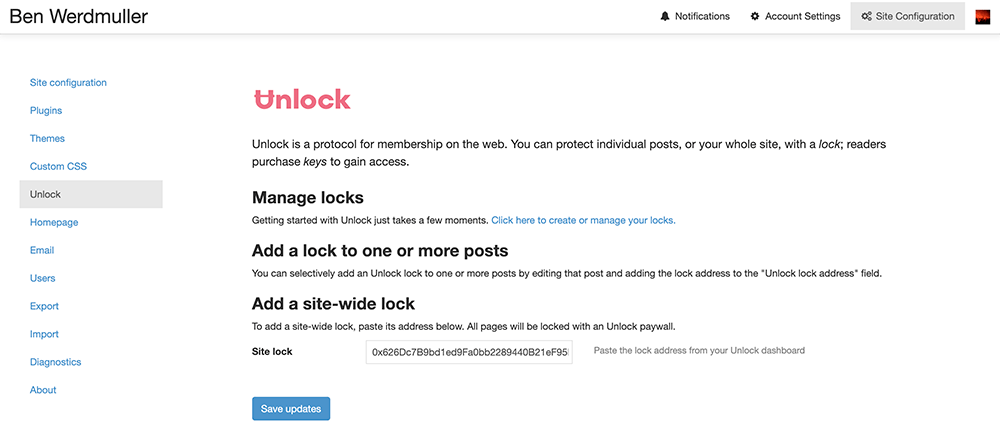
I added the site-wide ability to attach a lock to my Known site. When this is present, all long-form posts will be protected by that Unlock lock.
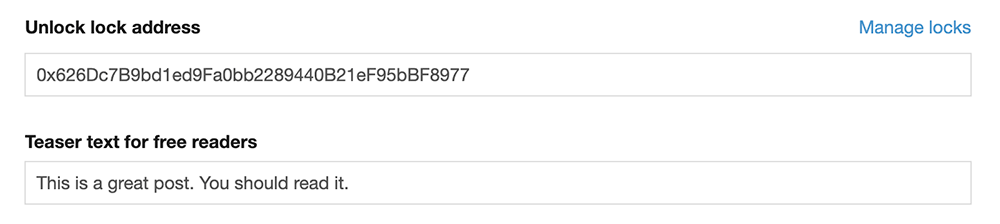
I also added a per-post lock field. Instead of using a site-wide lock, I could choose to add a lock address to just one or two particularly valuable posts. Then most of my site would remain free, but these posts would be restricted. I could also keep the whole site protected under one lock, but then use a different lock address for a handful of posts. That would allow me to charge extra for access to those.
When Known finds a lock on the page - either site-wide or relating to the post we're trying to view - it loads the paywall code, which looks like this:
<!-- Include this script in the <head> section of your page -->
<script src="https://paywall.unlock-protocol.com/paywall.min.js"
        data-unlock-url="https://paywall.unlock-protocol.com"></script>
<meta name="lock" content="<?= $lockAddress ?>"/>
Note that this is identical to the paywall code that anyone can use. The only difference is that we're retrieving the lock address from the site or post configuration with a short snippet of PHP.
2. The Unlock API.
On every post, I restricted access to commenting.
Here, I wanted to display my own UI, rather than using a built-in Unlock app. So I needed to use a combination of the Unlock JavaScript API and Known's back-end PHP library.
To begin with, I made sure both the Unlock configuration and library were loaded in the <head /> section of each page appropriately.
First the configuration object:
<script>
    var unlockProtocolConfig = {
    locks: {
        '<?=$lockAddress?>': {
            name: '<?=\Idno\Core\Idno::site()->config()->getTitle()?> Members',
        },
    },
    icon: 'https://unlock-protocol.com/images/svg/unlock-word-mark.svg',
    callToAction: {
        default:
            'Members can leave comments and participate in discussion.',
        },
    }
</script>
And then the library itself:
<script>
    (function (d, s) {
    var js = d.createElement(s),
    sc = d.getElementsByTagName(s)[0];
    js.src = "https://paywall.unlock-protocol.com/unlock.latest.min.js";
    sc.parentNode.insertBefore(js, sc);
    }(document, "script"));
</script>
I then created a replacement comment template in Known. Here, I loaded HTML for the comment form into a variable called commentForm; I also added HTML for a link with a call to action into a variable called commentCta.
<div id="comment-form"></div>
<script>
    // Load JS variable values from PHP variables
    var commentForm = <?=json_encode($commentForm)?>;
    var commentCta = <?=json_encode($commentCta)?>;

    // Listen to Unlock protocol API
    window.addEventListener('unlockProtocol', function (e) {
        var state = e.detail
        if (state === 'unlocked') {
            $('#comment-form').html(commentForm);
        }
        if (state === 'locked') {
            $('#comment-form').html(commentCta)
        }
    })
</script>
What's happening here? Once the Unlock protocol handler is loaded (which we did by adding the library and configuration above), all we need to do is listen for events generated by unlockProtocol. If event.detail is equal to unlocked, we know the current user has access to the lock. Conversely, if event.detail is equal to locked, we know the current user doesn't have access.
The form HTML is purely for Known, so I won't go into it here, but it's worth looking more closely at the CTA:
<div class="unlock-cta">
    <a href="#" onclick="window.unlockProtocol && unlockProtocol.loadCheckoutModal()">
        Purchase access to leave comments.</a>
</div>
On click, I check that window.unlockProtocol exists (i.e., the library has been loaded), and then load a provided method called unlockProtocol.loadCheckoutModal() that loads a modal containing the Unlock lock. The text shouldn't be a surprise: I set it in the callToAction of my configuration section.
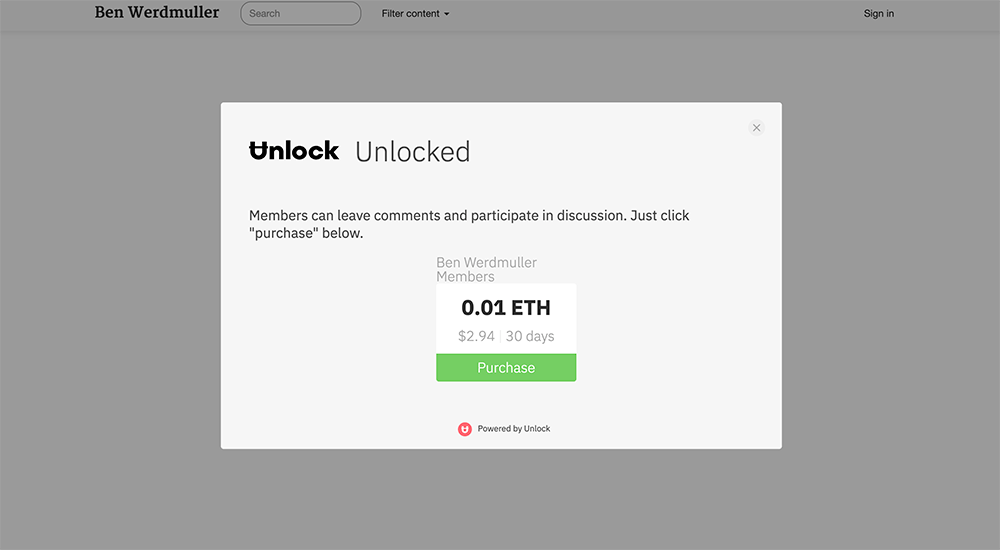
And that's all I need to do. The Unlock API manages the purchase process and all of the access control. It's as lightweight as it can be.
Have you integrated Unlock into your application? We'd love to hear from you. You can email us at [email protected] or come say hi on our Discord.