
Unlock Launches “Bring Your Own NFT” Token Gating
Using Unlock, creators now can token gate websites, Discord servers, and more using any ERC-721, ERC-1155, or ERC-20. We call this “Bring Your Own NFT” and it’s amazing.
One of the most common requests we’ve received over the past few months is “can I use an NFT from project x with Unlock?” Now the answer is a resounding “yes!”
Prior to this release, Unlock locks for token gating content and other resources would only open for NFT access keys that were minted from that Unlock lock itself. Now, thanks to some amazing development magic from the Unlock Protocol dev team, creators can configure their Unlock locks to work with any ERC-721, ERC-1155, or ERC-20. (We call this “Bring Your Own NFT.”)
- Want to have a section of your website where the content is only visible to holders of a World of Women NFT? You can do that.
- Want to give a special e-commerce discount to holders of Boss Beauties? You can do that as well.
- Want to set up a forum that’s only available to folks who have a Zed’s Run NFT? Done.
- Want to have special channel in your Discord server with snarky content that heckles folks who hold a BAYC NFT? We got you, fam. (I kid! I kid!)
Let’s take a deeper look.
Implementation details for Bring Your Own NFT
The core of this implementation is handled by transferring the question “does this person have an NFT from this contract?” from the Unlock lock itself to the contract that is associated with the NFT that is desired for access.
In order to do this, a small amount of configuration is required to configure what is known as a hook contract that maps the contract for the lock to the contract for the NFT collection. Then, we need to instruct the lock to use that mapping instead of its internal mechanism for checking for the possession of an NFT key.
How a creator can configure a Bring Your Own NFT token gate with Unlock
Here are the ingredients you’ll need in order to use an arbitrary ERC-721, ERC-1155, or ERC-20 with an Unlock lock. You’ll need:
- The contract address of the ERC-721, ERC-1155, or ERC-20 you’d like to use as the key
- A configured Unlock lock and its contract address
- The contract address of the hook contract that maps the Unlock lock to the NFT contract
Note: All three of the above contracts need to be on the same network (e.g. mainnet, Polygon, etc.) — this will not work if, say, the lock is on Polygon and the NFT you’d like to use as a key is on Ethereum mainnet.
End-to-end, creating the lock and mapping it to another ERC-721, ERC-1155, or ERC-20 should take about 5-10 minutes.
Here’s how to do it.
Walkthrough of Bring Your Own NFT on Unlock
For this example, let’s say we wanted to use the Unlock Protocol WordPress Plugin to restrict content on a WordPress page to holders of a Speakeasy (SPKZ) NFT. To do this, we’re going to create a lock on Polygon, and we will then map that lock to the SPKZ contract using a hook.
First, let’s find the contract address for the SPKZ NFTs. A quick way to do this is to go onto an NFT marketplace like OpenSea, go to an individual NFT from the NFT collection you want to use for the key, and open up the details for that collection.
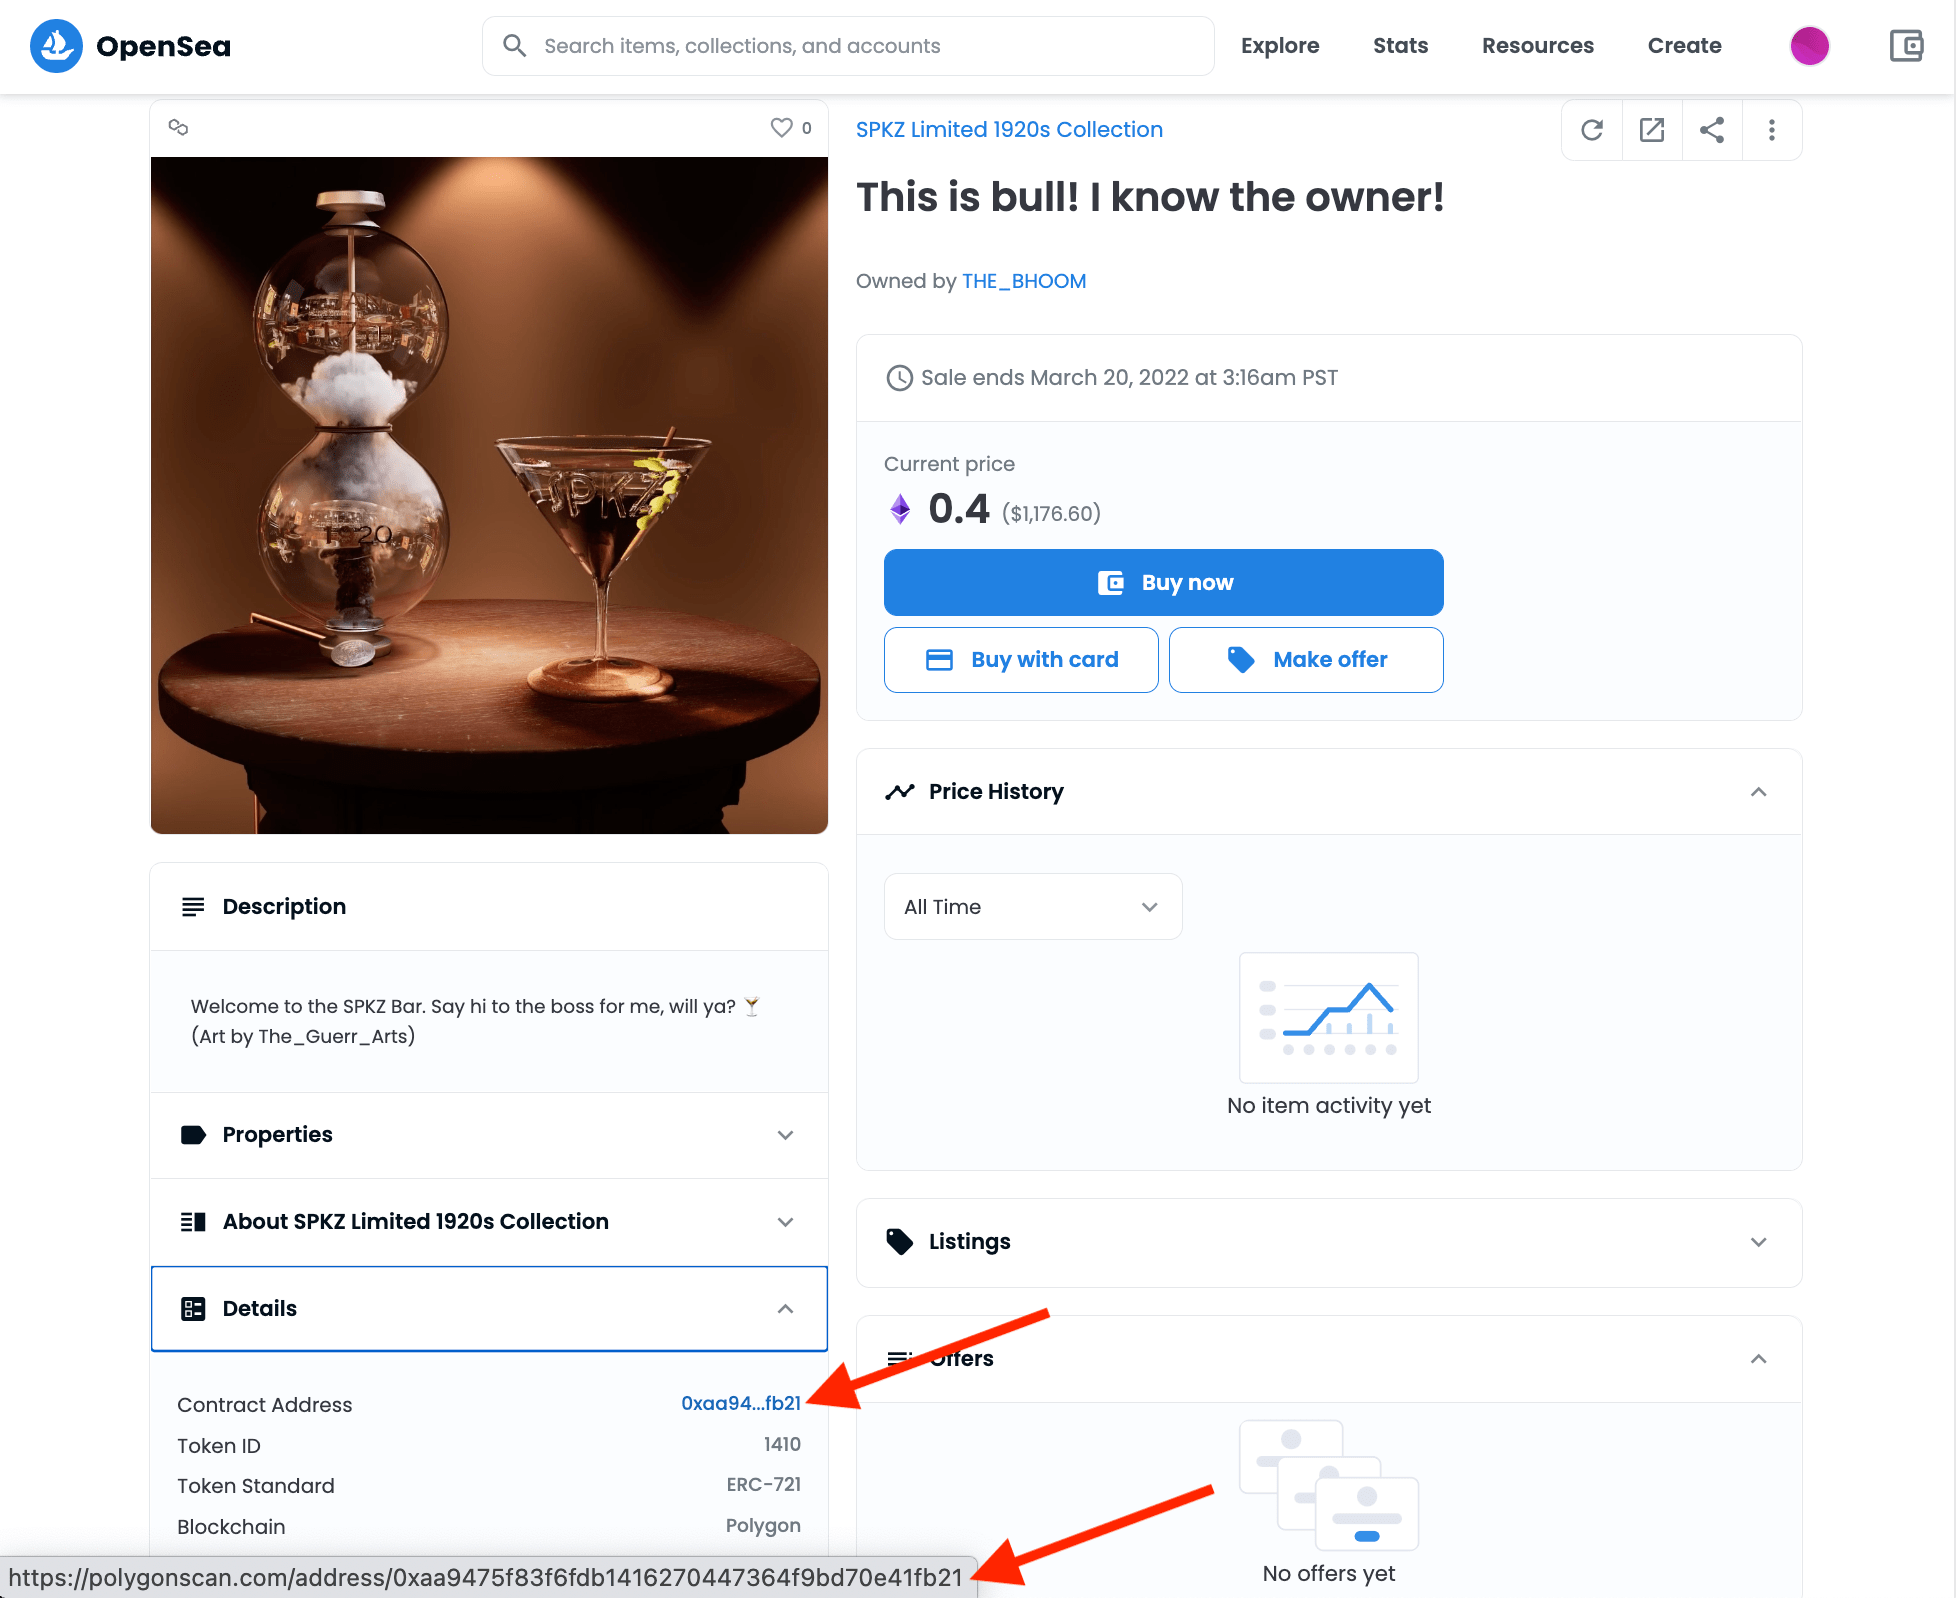
I see from the screenshot above that this SPKZ NFT is on Polygon, and the contract address is 0xaa9475f83f6fdb1416270447364f9bd70e41fb21
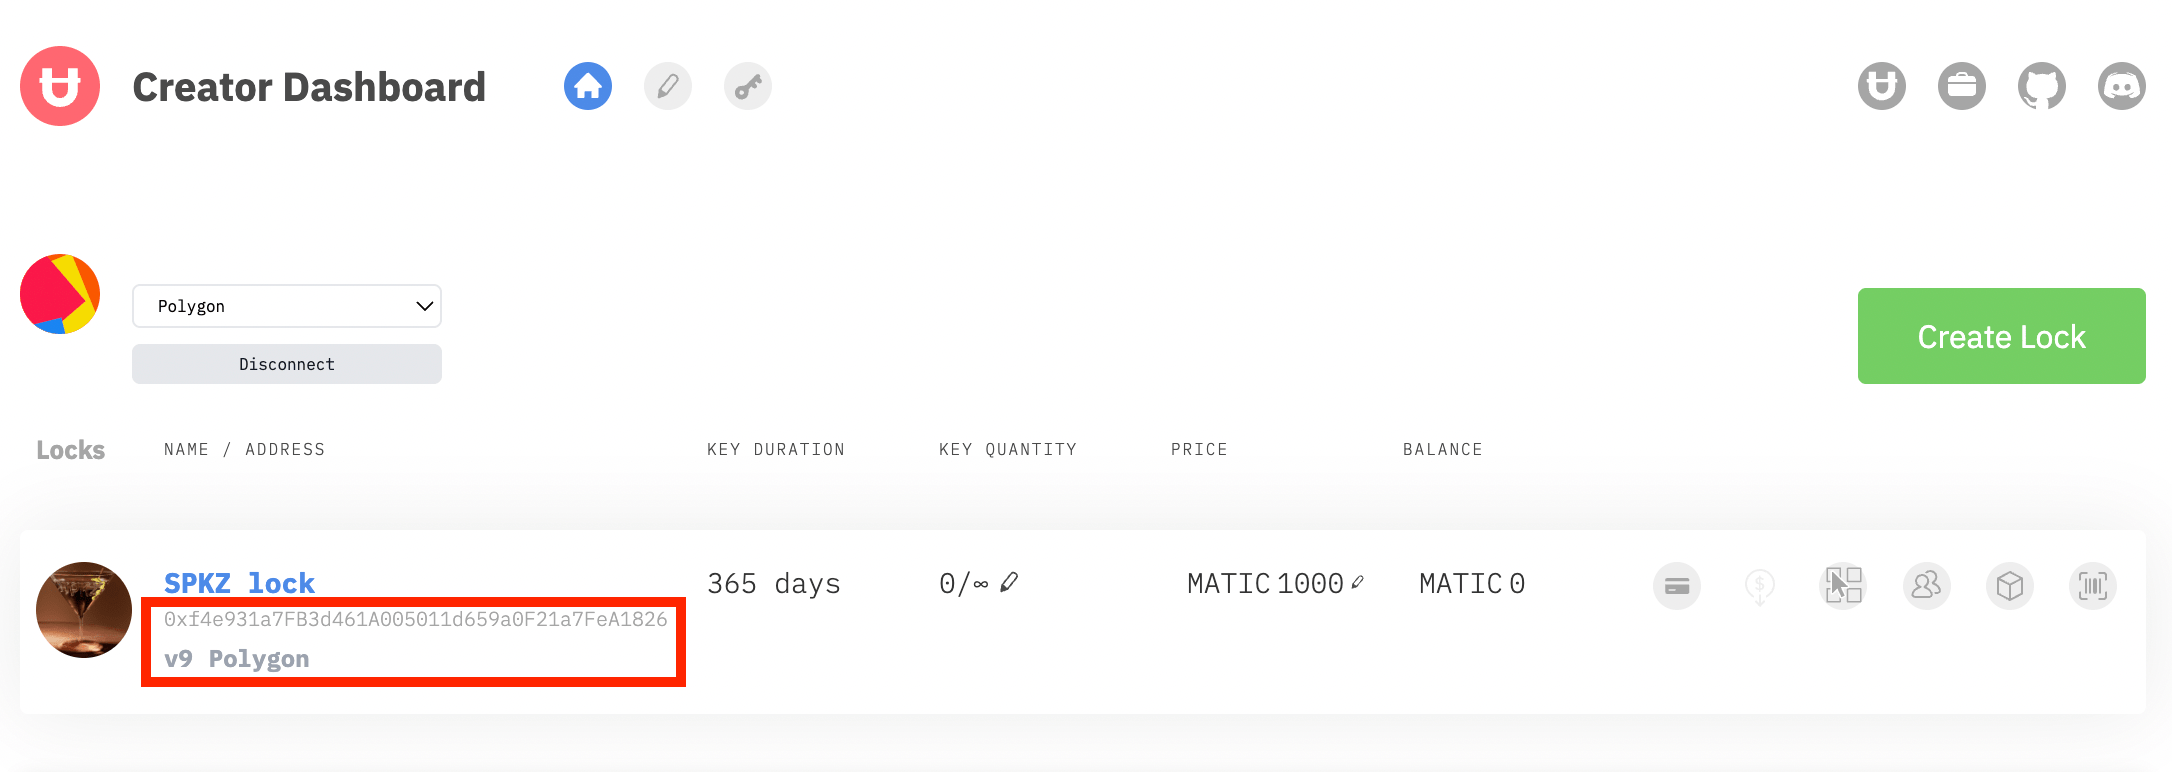
Great. Now, I’ll go to my Unlock Creator Dashboard and create a lock on Polygon.
💡 Note: Since this lock will be configured to look for the SPKZ NFT later in this blog post, the values of
Key Duration,Key Quantity, andPricedo not matter. They will be ignored and will not be used in this example.
The contract address for the Unlock lock is 0xf4e931a7FB3d461A005011d659a0F21a7FeA1826.
Ok! Two out of the three ingredients I need for my recipe are set. Next, I need to find and configure the hook contract to map the Unlock lock to the SPKZ NFT contract. I look up the Polygon hook contract address in the Unlock documentation on hook contracts and note the contract address for the Polygon hook contract for using an existing NFT is 0xf705b2dd649bbcb9418d08c1ff508a983f923516. (Note: this address may change in the future. Always refer to the official documentation for the most current contract addresses for the hook contracts.)
I now have the three ingredients I need:
- Contract address for my Unlock lock:
0xf4e931a7FB3d461A005011d659a0F21a7FeA1826 - Contract address for the NFT I want to use (SPKZ):
0xaa9475f83f6fdb1416270447364f9bd70e41fb21 - Contract address for the hook contract:
0xf705b2dd649bbcb9418d08c1ff508a983f923516
Now it’s time to wire things up.
Wiring the contracts up to the hook
First, you’ll need to set up the mapping on the hook. The instructions below are from the Unlock documentation on Using an Existing Contract, and are repeated here for readability.
💡 Different hook contracts on different chains (e.g. mainnet) will have different URLs than this one. In the example we’re walking through here, the block explorer for the Polygon hook contract is at: https://polygonscan.com/address/0xf705b2dd649bbcb9418d08c1ff508a983f923516.
The documentation tells us...
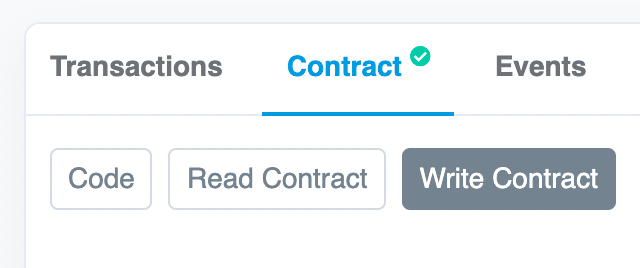
Using the block explorer for the mapping (hook) contract, click on the
Contractand then theWrite Contractbuttons.
Now, connect your wallet by clicking on the
Connect to Web3button in the block explorer. It is important that you do that from an address that is a Lock Manager on your lock (the account you used to deploy the lock is a lock manager). Then, in thecreateMappingform, enter the following values:
_lockAddress: this is the address for your lock (you can get it from your Unlock Dashboard)_nftAddress: that is the address for your pre-existing NFT contract (ERC721)
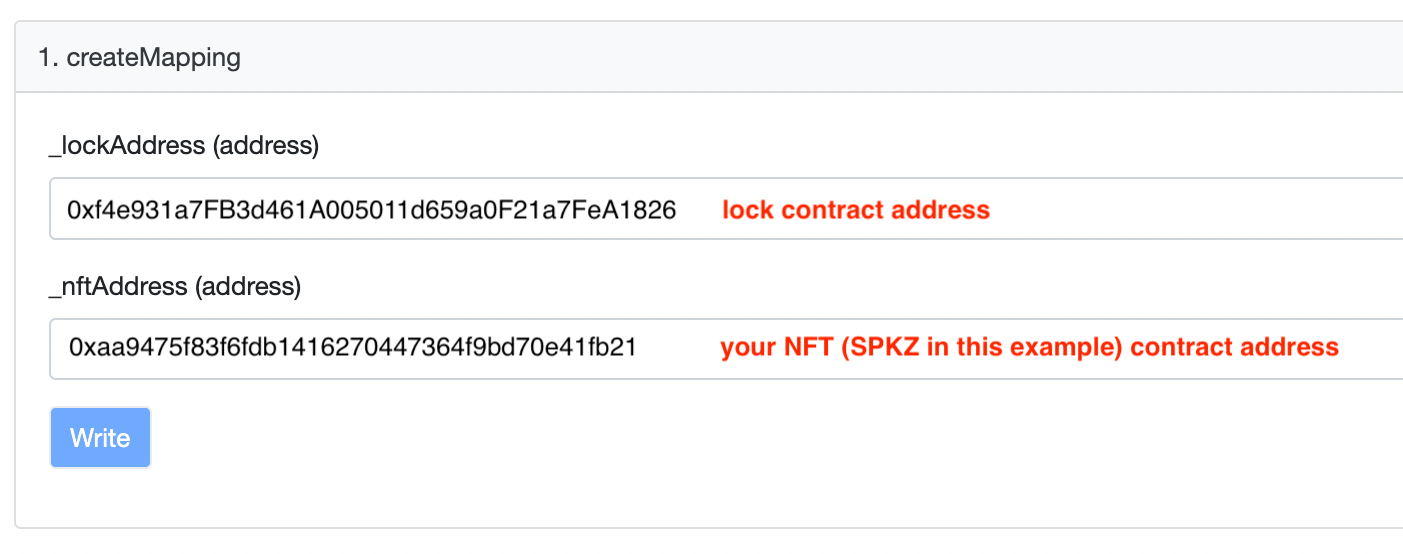
Then click on
Write. You will be prompted to send a transaction by your wallet. Validate and wait for this to have been executed.
At this point, the hook has wired up the lock to the NFT that you want to use. Now, we need to tell the lock to use the hook contract, instead of its own keys, to unlock content.
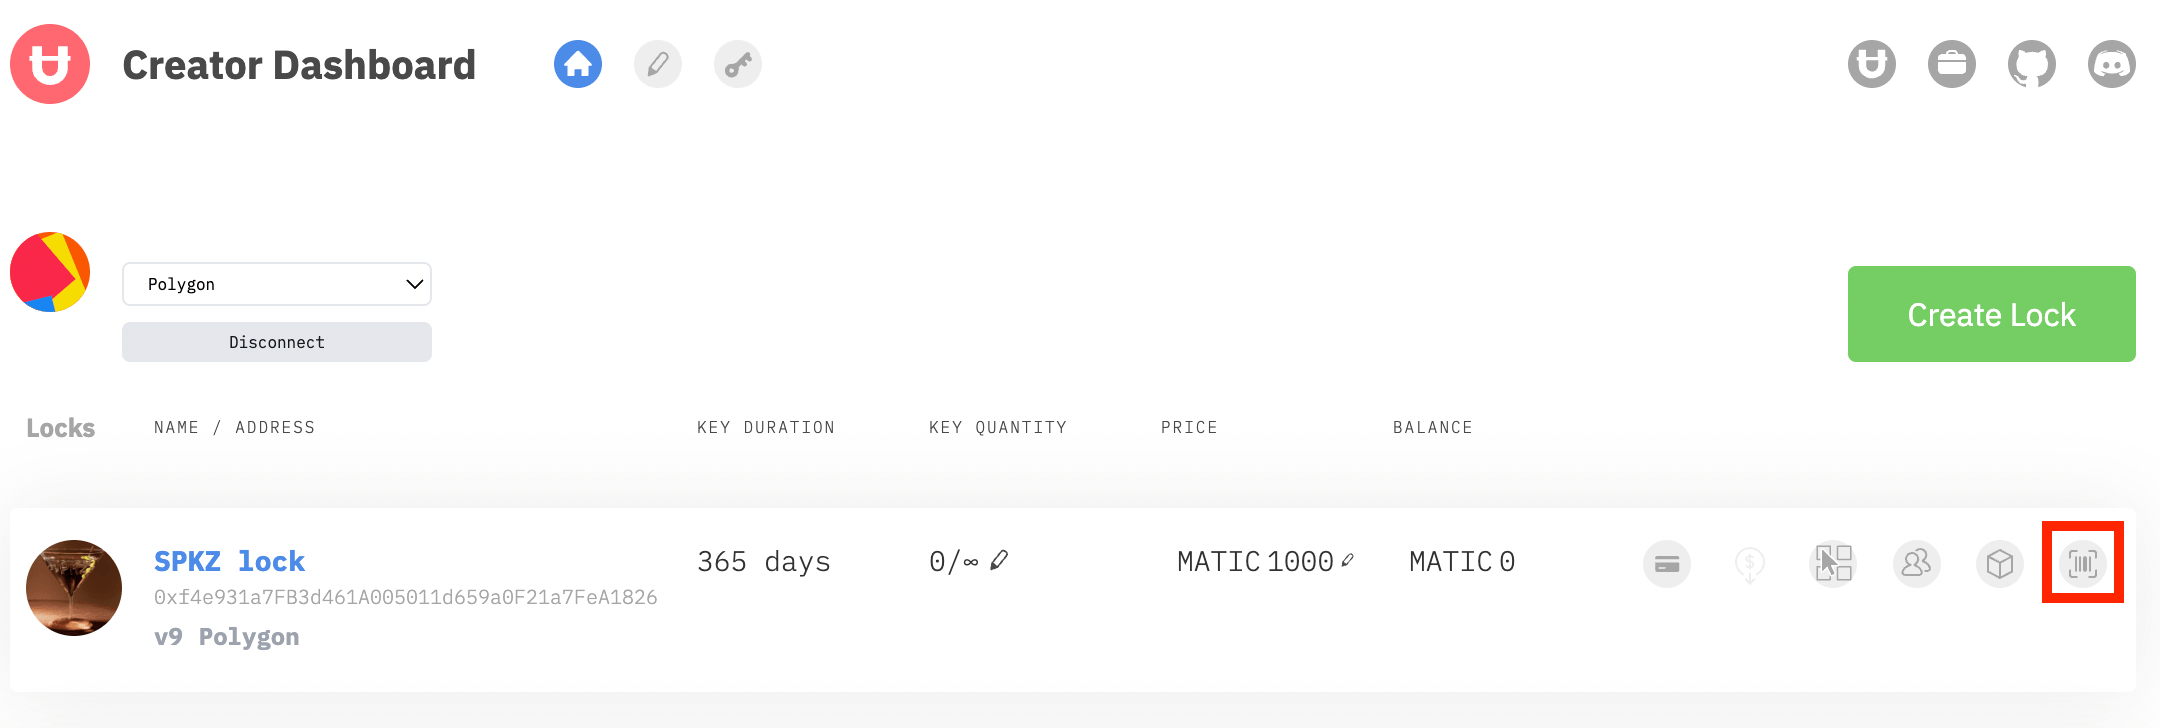
First, go to your lock’s block explorer by clicking the icon in the dashboard.
Again, we refer to the documentation on Using an Existing NFT.
Once on your lock's block explorer page, follow the same steps as above by clicking on
Contractand thenWrite as Proxy. Proceed to connect your wallet.
Then, look for the
SetEventHooksfunction
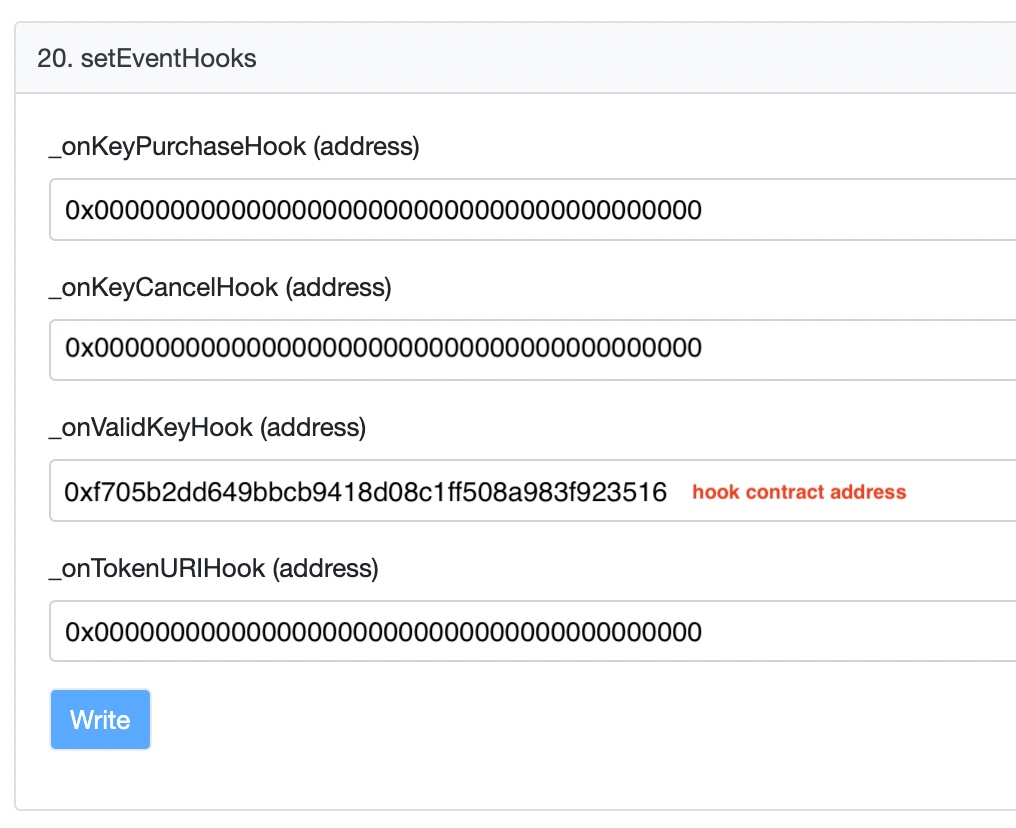
Hooks are 3rd party contracts that can be called when your lock itself is called. Here we are interested in changing the behavior of the validKey function, so you will enter the address of the hook contract for your network (see list above!) in the
_onValidKeyHookfield. Make sure you add0x0000000000000000000000000000000000000000in all the other fields to leave them unset. Click onWrite, confirm the transaction in your wallet and you should be all set!
And now, our sample lock is wired up, via the hook contract, to token gate access only to wallets that hold a SPKZ NFT.
Wrapping up
At this point, we are ready to go! In the example shown here, if we were to use our lock at 0xf4e931a7FB3d461A005011d659a0F21a7FeA1826 on a WordPress website, a Discord server, or another location, the lock would check for the presence of a SPKZ key in the wallet of the site visitor and grant access to holders of a SPKZ token.
Update May 2022: Added support for ERC-1155 NFTs and ERC-20 tokens with Bring Your Own NFT